Subir archivos por FTP es cosa del pasado. Con Git configurado correctamente, despliegas tu código con un simple git push y el servidor se actualiza automáticamente.
Esta guía te enseña a configurar Git para deploys profesionales en tu VPS.
Instalar Git
En el VPS
# Ubuntu/Debian
sudo apt update
sudo apt install git -y

# Verificar
git --version
Configuración inicial
# Configurar identidad
git config --global user.name "Tu Nombre"
git config --global user.email "[email protected]"

# Editor por defecto
git config --global core.editor nano

# Ver configuración
git config --list
Deploy con Git: El flujo
Opciones de deploy
| Método | Complejidad | Uso |
|---|---|---|
| Git pull manual | Baja | Proyectos pequeños |
| Git bare + hook | Media | Deploy automático |
| GitHub Actions | Media-Alta | CI/CD completo |
Método 1: Git pull manual
El más simple. Clonas el repo y haces pull cuando hay cambios.
En el VPS
# Clonar repositorio
cd /var/www
git clone https://github.com/usuario/mi-proyecto.git sitio

# Dar permisos
sudo chown -R www-data:www-data /var/www/sitio
Actualizar
cd /var/www/sitio
git pull origin main

# Si hay dependencias
npm install  # Node.js
composer install  # PHP
pip install -r requirements.txt  # Python

# Reiniciar si es necesario
sudo systemctl restart php8.2-fpm
Script de deploy
#!/bin/bash
# /root/scripts/deploy.sh
cd /var/www/sitio
git pull origin main
npm install --production
npm run build
sudo systemctl restart php8.2-fpm
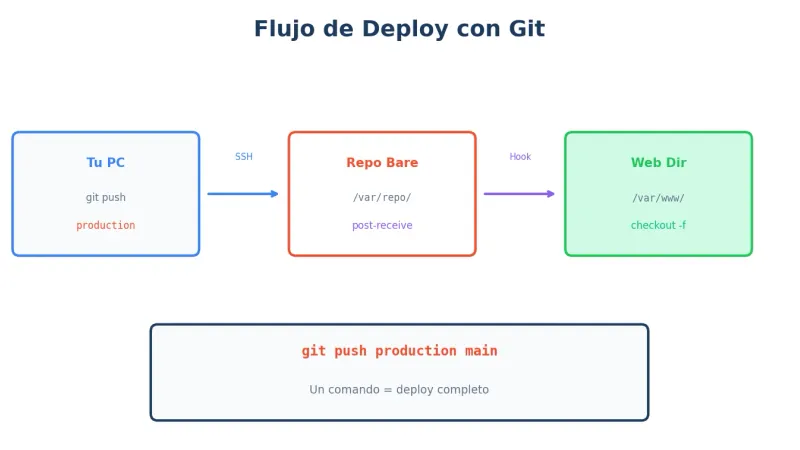
echo "Deploy completado: $(date)"Método 2: Git bare + hook (recomendado)
Deploy automático al hacer git push. Sin tocar el servidor manualmente.
Crear repositorio bare
# Crear directorio para repos
sudo mkdir -p /var/repo
sudo chown -R $USER:$USER /var/repo
# Crear repo bare
cd /var/repo
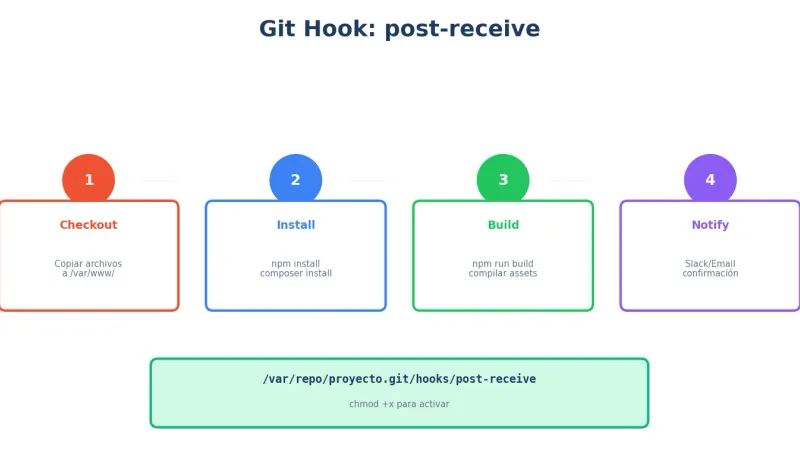
git init --bare mi-proyecto.gitCrear hook post-receive
nano /var/repo/mi-proyecto.git/hooks/post-receive#!/bin/bash
TARGET="/var/www/mi-proyecto"
GIT_DIR="/var/repo/mi-proyecto.git"
BRANCH="main"
while read oldrev newrev ref
do
if [ "$ref" = "refs/heads/$BRANCH" ]; then
echo "Desplegando rama $BRANCH..."
# Checkout al directorio web
git --work-tree=$TARGET --git-dir=$GIT_DIR checkout -f $BRANCH
# Permisos
chown -R www-data:www-data $TARGET
# Comandos post-deploy
cd $TARGET
# Para Node.js
if [ -f "package.json" ]; then
npm install --production
npm run build 2>/dev/null || true
fi
# Para PHP/Composer
if [ -f "composer.json" ]; then
composer install --no-dev --optimize-autoloader
fi
# Limpiar caché
# wp cache flush --path=$TARGET 2>/dev/null || true
echo "Deploy completado: $(date)"
fi
done# Hacer ejecutable
chmod +x /var/repo/mi-proyecto.git/hooks/post-receiveCrear directorio destino
sudo mkdir -p /var/www/mi-proyecto
sudo chown -R www-data:www-data /var/www/mi-proyecto
Configurar en tu máquina local
# En tu proyecto local
cd mi-proyecto

# Añadir remote del VPS
git remote add production usuario@tu-vps:/var/repo/mi-proyecto.git

# Ver remotes
git remote -v
Desplegar
# Push a producción
git push production main

# Verás la salida del hook en tu terminal
Deploy con clave SSH
Generar clave (si no tienes)
# En tu máquina local
ssh-keygen -t ed25519 -C "deploy-key"
Añadir al VPS
# Copiar clave pública al VPS
ssh-copy-id -i ~/.ssh/id_ed25519.pub usuario@tu-vps

# O manualmente
cat ~/.ssh/id_ed25519.pub
# Pegar en ~/.ssh/authorized_keys del VPS
Configurar SSH config
# ~/.ssh/config
Host mi-vps
    HostName tu-vps.com
    User usuario
    IdentityFile ~/.ssh/id_ed25519
# Ahora puedes usar
git remote add production mi-vps:/var/repo/mi-proyecto.gitHooks útiles
Hook con notificación Slack
#!/bin/bash
# post-receive con Slack

TARGET="/var/www/mi-proyecto"
GIT_DIR="/var/repo/mi-proyecto.git"
SLACK_WEBHOOK="https://hooks.slack.com/services/xxx"

while read oldrev newrev ref
do
    BRANCH=$(echo $ref | cut -d/ -f3)

    if [ "$BRANCH" = "main" ]; then
        # Deploy
        git --work-tree=$TARGET --git-dir=$GIT_DIR checkout -f main

        # Obtener info del commit
        COMMIT=$(git --git-dir=$GIT_DIR log -1 --pretty=format:"%h - %s (%an)")

        # Notificar a Slack
        curl -X POST -H 'Content-type: application/json' \
            --data "{\"text\":\"🚀 Deploy completado: $COMMIT\"}" \
            $SLACK_WEBHOOK

        echo "Deploy completado: $COMMIT"
    fi
done
Hook con rollback automático
#!/bin/bash
# post-receive con rollback

TARGET="/var/www/mi-proyecto"
GIT_DIR="/var/repo/mi-proyecto.git"
HEALTH_URL="http://localhost/health"

while read oldrev newrev ref
do
    if [ "$ref" = "refs/heads/main" ]; then
        # Guardar commit anterior
        PREV_COMMIT=$oldrev

        # Deploy
        git --work-tree=$TARGET --git-dir=$GIT_DIR checkout -f main

        cd $TARGET
        npm install --production
        npm run build

        # Verificar health
        sleep 5
        if ! curl -sf $HEALTH_URL > /dev/null; then
            echo "ERROR: Health check falló. Haciendo rollback..."
            git --work-tree=$TARGET --git-dir=$GIT_DIR checkout -f $PREV_COMMIT
            npm install --production
            npm run build
            echo "Rollback completado a $PREV_COMMIT"
            exit 1
        fi

        echo "Deploy exitoso: $newrev"
    fi
done
Hook para WordPress
#!/bin/bash
# post-receive para WordPress (solo tema)

TARGET="/var/www/wordpress/wp-content/themes/mi-tema"
GIT_DIR="/var/repo/mi-tema.git"

while read oldrev newrev ref
do
    if [ "$ref" = "refs/heads/main" ]; then
        git --work-tree=$TARGET --git-dir=$GIT_DIR checkout -f main

        cd $TARGET

        # Instalar dependencias del tema
        if [ -f "package.json" ]; then
            npm install
            npm run build
        fi

        # Permisos
        chown -R www-data:www-data $TARGET

        # Limpiar caché de WordPress
        wp cache flush --path=/var/www/wordpress --allow-root 2>/dev/null

        echo "Tema desplegado: $(date)"
    fi
done
Deploy desde GitHub/GitLab
Con deploy key
# En el VPS, generar clave
ssh-keygen -t ed25519 -C "vps-deploy-key" -f ~/.ssh/deploy_key

# Ver clave pública
cat ~/.ssh/deploy_key.pub

# Añadir en GitHub: Settings → Deploy keys → Add
Clonar con deploy key
# Configurar SSH
nano ~/.ssh/config
Host github.com
HostName github.com
User git
IdentityFile ~/.ssh/deploy_key# Clonar
git clone [email protected]:usuario/repo.git /var/www/sitioScript de deploy desde GitHub
#!/bin/bash
# /root/scripts/deploy-from-github.sh

REPO_DIR="/var/www/mi-proyecto"
BRANCH="main"

cd $REPO_DIR

# Fetch cambios
git fetch origin

# Verificar si hay cambios
LOCAL=$(git rev-parse HEAD)
REMOTE=$(git rev-parse origin/$BRANCH)

if [ "$LOCAL" = "$REMOTE" ]; then
    echo "Ya está actualizado"
    exit 0
fi

# Hacer pull
git pull origin $BRANCH

# Post-deploy
npm install --production
npm run build

echo "Actualizado de $LOCAL a $REMOTE"
Múltiples entornos
Estructura de branches
main        → Producción
staging     → Pre-producción
develop     → Desarrollo
Múltiples remotes
# En tu máquina local
git remote add production usuario@vps-prod:/var/repo/proyecto.git
git remote add staging usuario@vps-staging:/var/repo/proyecto.git

# Deploy a staging
git push staging develop:main

# Deploy a producción
git push production main
Hook multi-branch
#!/bin/bash
# post-receive multi-entorno

while read oldrev newrev ref
do
    BRANCH=$(echo $ref | cut -d/ -f3)

    case $BRANCH in
        main)
            TARGET="/var/www/produccion"
            ;;
        staging)
            TARGET="/var/www/staging"
            ;;
        *)
            echo "Branch $BRANCH ignorada"
            continue
            ;;
    esac

    echo "Desplegando $BRANCH en $TARGET..."
    git --work-tree=$TARGET --git-dir=$GIT_DIR checkout -f $BRANCH

    cd $TARGET
    npm install --production
    npm run build

    echo "Deploy $BRANCH completado"
done
Comandos útiles
En el VPS
# Ver último commit desplegado
cd /var/www/sitio
git log -1 --oneline

# Ver cambios pendientes (si editaste en servidor)
git status
git diff

# Descartar cambios locales
git checkout -- .
git clean -fd

# Forzar sync con remote
git fetch origin
git reset --hard origin/main
Debugging de hooks
# Ver log del hook
# Los hooks escriben a stdout, visible en el git push

# Probar hook manualmente
cd /var/repo/mi-proyecto.git
echo "oldrev newrev refs/heads/main" | ./hooks/post-receive

# Ver errores
tail -f /var/log/syslog | grep git
Seguridad
Proteger el repo bare
# Solo acceso SSH, no HTTP
# Firewall
sudo ufw deny 9418  # Puerto git

# Permisos restrictivos
chmod 700 /var/repo
chmod 700 /var/repo/mi-proyecto.git
Usuario dedicado para deploy
# Crear usuario
sudo adduser --disabled-password deploy

# Añadir a www-data
sudo usermod -aG www-data deploy

# Configurar sudo limitado
sudo visudo
# deploy ALL=(www-data) NOPASSWD: ALL
Preguntas frecuentes
¿Git bare o git clone normal en el servidor?
Git bare para recibir pushes y desplegar con hooks. Git clone normal si solo haces pull manualmente. El método bare + hook es más profesional y automatizado.
¿Por qué mi hook no se ejecuta?
Verifica que el hook es ejecutable (chmod +x). También revisa que el nombre sea exacto (post-receive, sin extensión). Los errores de sintaxis también pueden impedirlo.
¿Puedo usar Git con WordPress?
Sí, pero normalmente solo para el tema o plugins custom. No incluyas wp-content/uploads ni wp-config.php en el repo. Usa .gitignore adecuado.
¿Git o GitHub Actions para deploy?
Git bare + hooks es más simple y directo. GitHub Actions es mejor si necesitas tests, builds complejos, o despliegues condicionales. Puedes combinar ambos.
¿Cómo hago rollback a una versión anterior?
En el servidor: git checkout COMMIT_HASH. O implementa rollback en tu hook guardando el commit anterior y revirtiendo si el health check falla.
Nuestra recomendación
Setup básico:
- Repositorio bare en /var/repo
- Hook post-receive con deploy automático
- Remote “production” en tu máquina local
- Deploy con
git push production main
Para equipos:
- Múltiples entornos (staging, producción)
- Hooks con notificaciones
- Rollback automático
- Usuario deploy dedicado
¿Necesitas CI/CD gestionado? La administración gestionada de Avantys incluye configuración de pipelines de deploy.
Conclusión
Git transforma los deploys de una tarea manual y propensa a errores en un proceso automatizado y confiable. Con un hook bien configurado, despliegas con un comando y tienes rollback si algo falla.
Empieza con el método bare + hook y evoluciona según necesites.
¿Necesitas un VPS para tus proyectos? Explora los VPS de Avantys con Git preconfigurado.
¿Quieres que lo hagamos por ti?
En Avantys gestionamos tu web, hosting y crecimiento digital de punta a punta. Tú a lo importante.